First Voice-Over Demo Reel
Creating Your First Voice-Over Demo Reel
Creating your first voice-over demo reel is one of the most exciting milestones in your journey as a voice actor.
It can also be one of the most intimidating.
A demo reel places your voice, performance ability, recording quality, and creative identity into a single audio showcase. It may be the first thing a casting director, producer, author, game developer, or potential client hears from you, so it is understandable that pressing record can suddenly feel rather more serious than usual.
However, your first reel does not need to demonstrate every voice you can perform or predict the entire direction of your future career. Its purpose is much simpler:
To present your current strengths clearly, professionally, and honestly.
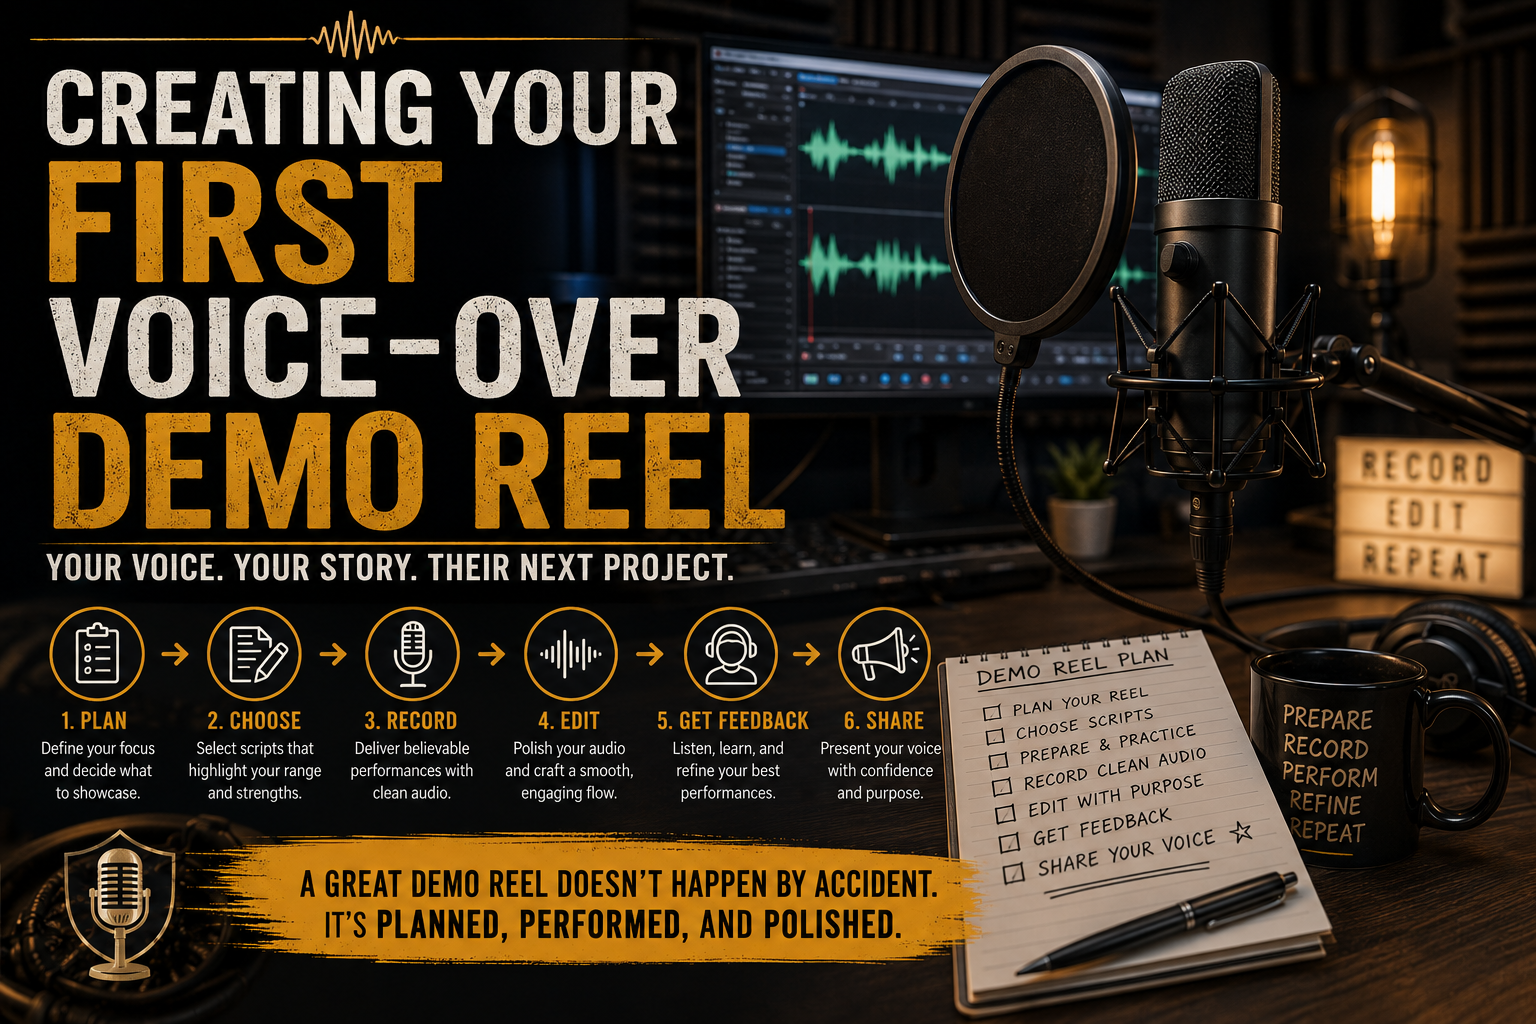
A strong demo begins long before the microphone is switched on. It requires planning, thoughtful script choices, believable performances, clean recording, careful editing, and an honest assessment of whether you are ready to publish it.
What Is a Voice-Over Demo Reel?
A voice-over demo reel is a short collection of professionally presented performance samples. It allows potential clients to quickly assess your vocal qualities, acting ability, delivery style, technical quality, and suitability for a particular project.
Most reels focus on one specific area of voice-over, such as:
- Commercial voice-over
- Audiobook narration
- Video games
- Animation
- Character performance
- Corporate narration
- E-learning
- Documentary narration
- Trailers and promos
Trying to include every possible style in one reel can make the result feel unfocused. A warm commercial read, a snarling fantasy villain, a calm medical narration, and an energetic cartoon goblin may all demonstrate range, but they are unlikely to appeal to the same client.
Rather than creating one enormous reel, build separate demos for the areas of work you want to pursue.
Make it easy for listeners to find what they need.
Begin With a Clear Plan
Before searching for scripts or opening your recording software, decide what the reel is meant to accomplish.
Ask yourself:
- What type of voice-over work do I want this reel to attract?
- Who is likely to listen to it?
- What vocal qualities do I want them to remember?
- Which styles currently suit me best?
- What can I perform consistently and confidently?
- What should the listener understand within the first few seconds?
Your answers will shape every decision that follows.
For example, a commercial reel may need to demonstrate warmth, confidence, natural conversation, authority, energy, or sincerity. A character reel may focus more heavily on acting range, emotional intensity, vocal contrast, physicality, and character identity.
An audiobook demo may need longer samples that allow the listener to assess storytelling, pacing, narration style, dialogue, character consistency, and vocal stamina.
Without a clear purpose, a reel can quickly become a collection of unrelated performances rather than a focused professional showcase.
Decide Whether You Are Ready
A good microphone and recording software do not automatically mean you are ready to produce a professional demo.
A demo should represent the standard of performance and audio quality that a client can expect when they hire you. Anything included on the reel should be something you can reproduce consistently during a real project.
Before creating a public-facing demo, you should be reasonably comfortable with:
- Reading naturally rather than merely reciting words
- Understanding the audience and intention behind a script
- Taking and applying direction
- Controlling pacing, emphasis, breath, and volume
- Maintaining consistent microphone technique
- Recording clean audio
- Editing without damaging the performance
- Repeating a voice or delivery style when required
- Recognising when a take is believable and when it is not
You do not need to be flawless.
Waiting for perfection usually results in a microphone gathering dust while its owner researches another sixteen videos about compression settings.
You should, however, be able to distinguish between a useful practice recording and a sample you would confidently send to a potential client.
Create a Practice Reel First
Your first assembled reel does not have to become your permanent professional demo.
Creating a private practice reel is one of the best ways to understand the process before publishing anything. It gives you space to experiment, make mistakes, and discover what actually suits your voice.
Use your practice reel to test:
- Different script styles
- Clip lengths
- Performance choices
- The order of your samples
- Music and sound effects
- Transitions
- Editing techniques
- Your overall vocal range
You may discover that two characters sound too similar, a commercial script does not suit your natural delivery, or the performance you expected to be strongest feels less convincing once placed beside the others.
That is valuable information.
Your practice reel is not a failed professional reel. It is the workshop in which the professional version begins to take shape.
Choose Scripts That Match Real Work
The scripts on your demo should resemble the type of material you hope to be hired to perform.
For a commercial reel, you might include:
- A relaxed lifestyle advertisement
- A warm charity or healthcare message
- A confident technology read
- An energetic entertainment promotion
- A restrained luxury brand script
For an audiobook demo, you might record separate samples featuring:
- First-person narration
- Third-person narration
- Dialogue between multiple characters
- Fiction
- Non-fiction
- Emotional storytelling
- A genre suited to your voice
For a character or video-game reel, you could include:
- A grounded protagonist
- A threatening antagonist
- A comedic supporting character
- An emotionally vulnerable scene
- A creature or non-human character
- A high-intensity combat performance
Every script should give you something meaningful to perform.
Look for material with a clear audience, objective, emotional point of view, and change of thought. A script filled with dramatic vocabulary is not automatically useful if it gives you no emotional journey or believable intention.
Use Original Material Where Possible
Recreating a famous advertisement, game character, film trailer, or audiobook passage may seem like an easy way to demonstrate your abilities.
The problem is that familiar material invites direct comparison with the original performance.
It can also make your reel feel more like an imitation than a presentation of your own voice.
Original scripts allow you to shape the material around your strengths. They also reduce the risk of implying that you worked on a recognisable production when you did not.
You can write your own scripts, work with a coach or demo producer, or use practice material created specifically for voice actors.
The goal is not to pretend you have already been hired by major brands or studios. It is to show what you could bring to similar work.
Keep Each Clip Focused
Most listeners will form an impression quickly.
A commercial or character reel should move efficiently, with each clip establishing its tone and purpose within the first few seconds. Do not spend twenty seconds introducing a character before reaching the part that demonstrates your ability.
Every clip should reveal something new.
You might vary:
- Energy
- Pace
- Emotional tone
- Vocal age
- Character status
- Intimacy
- Authority
- Humour
- Physicality
Avoid including several clips that demonstrate almost identical performances. If two pieces show the same warm, conversational delivery, keep the stronger one and use the available time to show another dimension of your range.
Audiobook samples may be longer because clients need time to assess storytelling and character consistency. These are often presented as separate samples rather than one rapidly edited reel.
Whatever the format, every second should earn its place.
Lead With Your Strongest Performance
Do not hide your best clip at the end as though it is the prize inside a box of cereal.
Your opening needs to capture attention immediately.
The first clip should represent one of your strongest and most marketable performance styles. It should sound polished, believable, and appropriate for the kind of work you want to attract.
After the opening, arrange the remaining clips to create contrast and momentum.
A strong sequence might move from natural and conversational to confident and energetic, followed by something emotionally sincere or dramatically different.
The reel should feel deliberately structured rather than randomly assembled.
Prepare Before Recording
Once your scripts have been selected, resist the urge to record them immediately.
Begin by analysing each piece.
Identify:
- Who is speaking?
- Who are they speaking to?
- What do they want?
- What happened immediately before the script begins?
- What emotion are they showing?
- What emotion might they be hiding?
- What changes during the piece?
- How should the listener feel at the end?
Mark important words, shifts in thought, pauses, difficult phrases, and pronunciation notes.
Read the script aloud several times before recording. This helps reveal awkward sentences, unnatural phrasing, and places where your breath or rhythm may become strained.
Preparation makes the performance feel spontaneous. Skipping preparation often produces a beautifully recorded person visibly trying to read.
Record Different Interpretations
Do not record the same delivery repeatedly and hope that one version will mysteriously become better.
Experiment with intention.
Try one take that is more intimate. Record another with greater urgency. Explore restraint, warmth, confidence, suspicion, vulnerability, playfulness, or authority where appropriate.
Small changes in intention can completely transform the meaning of a line.
Listen for the version that feels most believable, not merely the one with the fewest breaths or mouth noises.
Technical imperfections can often be repaired or rerecorded. A lifeless performance remains lifeless, even after it has been polished until it gleams.
Prioritise Clean Recording Quality
Your demo should reflect the recording quality a client can expect from you.
Record in the quietest and most acoustically controlled space available. Listen carefully for:
- Room echo
- Traffic
- Computer fans
- Electrical hum
- Heating systems
- Neighbours
- Clothing movement
- Desk vibrations
- Mouth clicks
- Plosives
- Excessive sibilance
Maintain a consistent distance from the microphone and avoid turning your head away while speaking.
Set your recording level carefully. Your audio should be strong enough to remain clear without clipping or distorting during louder moments.
Record a short test before beginning each session. Listen through headphones and check the audio rather than relying entirely on what the waveform looks like.
A waveform can tell you that sound exists. It cannot tell you that your neighbour’s lawnmower has joined the cast.
Edit Without Removing the Humanity
Editing should make the performance easier to hear, not less human.
Remove obvious mistakes, distracting noises, unwanted gaps, repeated lines, and unnecessary breaths. However, avoid cutting every pause and inhalation until the performance sounds unnaturally mechanical.
Natural speech contains rhythm, silence, breath, and movement.
Use audio processing carefully. Equalisation, compression, de-essing, noise reduction, and other tools should support the recording rather than dramatically reshape it.
Common editing problems include:
- Over-compression
- Aggressive noise reduction
- Unnatural silence between phrases
- Inconsistent volume between clips
- Abrupt transitions
- Music overpowering the voice
- Excessive effects
- Different acoustic qualities between samples
Listen to the complete reel on headphones, speakers, and an ordinary phone or laptop. A potential client may not hear it through studio monitors, so it needs to remain clear across common devices.
Use Music and Sound Design Carefully
Music and sound effects can help establish context, especially in commercial, gaming, animation, trailer, and character reels.
They can also overwhelm the performance.
The voice must remain the focus. Music should support the tone without competing with the dialogue. Sound effects should create atmosphere without turning the reel into a miniature film in which the actor has somehow become an extra.
Make sure you have the right to use any additional audio included in the reel. Choose original, royalty-free, or properly licensed music and effects, and keep records of your licences.
It may also be useful to keep dry versions of individual samples so potential clients can hear your voice without production underneath it.
Ask for Specific Feedback
Before publishing your reel, share it privately with people whose judgement you trust.
A voice coach, experienced actor, demo producer, audio engineer, or knowledgeable peer may notice issues that have become invisible to you after the seventeenth listen.
Ask specific questions:
- Did the opening make you want to continue listening?
- Which performance felt most believable?
- Did any clips sound too similar?
- Was anything too long?
- Could you hear every word clearly?
- Did the music distract from the voice?
- What type of work would you cast me for?
- Which clip would you remove?
Specific questions produce more useful feedback than simply asking, “Is it good?”
You are not collecting compliments. You are gathering information that can improve the reel.
Consider Professional Production
Self-producing a practice reel can teach you an enormous amount about your voice, recording process, and editing skills.
When you are ready to market yourself professionally, working with a specialist demo producer may be worthwhile.
An experienced producer can help with:
- Identifying your marketable strengths
- Selecting or writing suitable scripts
- Directing your performances
- Creating contrast between clips
- Recording and editing
- Sound design
- Music selection and licensing
- Structuring the final reel
Professional production is not a substitute for training. A producer can present your abilities effectively, but they cannot turn an unprepared performance into a reliable professional skill.
Build the ability first. Package it second.
Final Readiness Checklist
Before publishing your first demo reel, ask:
- Does the reel focus on one clear area of voice-over?
- Does the opening represent one of my strongest performances?
- Does every clip demonstrate something different?
- Do the scripts resemble real professional work?
- Are the performances believable?
- Can I recreate every voice and delivery consistently?
- Is the recording clean and free from distracting noise?
- Are the transitions smooth?
- Is the volume consistent?
- Does the voice remain clear above music and effects?
- Do I have permission to use every additional audio element?
- Does this represent the quality I can deliver to a client now?
If several answers are no, return to the practice stage.
That is not a setback. It is quality control.
Press Record Before Confidence Arrives
The most difficult part of creating your first demo reel is often not choosing scripts, learning editing software, or setting microphone levels.
It is allowing yourself to begin.
Hearing your recorded voice can make every breath, pause, click, and imperfect word feel enormous. That discomfort is normal. It does not mean you lack potential. It means you are hearing your work closely enough to improve it.
Record the first version.
Listen back honestly.
Identify what works.
Change what does not.
Then record it again.
Your first demo reel does not need to prove that you have mastered every corner of the voice-over industry. It only needs to present your current abilities with clarity, confidence, and purpose.
Every demo begins with an empty recording track.
Every voice-over career begins with someone deciding to press record.